There are many ways to improve the default WordPress security and protect your WordPress site overall. There are plugins, core tweaks you can do, and general good practices when selecting your passwords.
However, not all of those fixes are that easy to handle and implement.
So today, let’s welcome Akshat Choudhary who’s going to make all this clearer and share a step by step guide on how to protect your WordPress site with MalCare … from start to finish.
This is a contribution by Akshat Choudhary:
WordPress is an extremely popular Content Management System but it is not completely safe. Neither is any software or platform out there. Hackers always work on new ways to bypass the existing security system.
This is why you need to learn to protect your WordPress site (tips), no matter the size of it. Targeting a large number of sites is a bot’s favorite way of attacking WordPress websites. But this is where WordPress’ popularity actually is advantageous.
There are so many plugins available now for every user’s whim and fancy. Security plugins are common and have fantastic offerings – From Sucuri’s Incident Response Team to WordFence Firewall, each plugin offers something for everyone concerned about their site’s safety.
But there are only a few plugins that apply a bottom-up approach and address the issues plaguing WordPress security at a grass root level. Yes, we do have a plugin in mind – MalCare. MalCare WordPress Security is a great choice for everyone, from Agencies to Developers to even WordPress newbies.
Let us first explore why MalCare is perhaps the best security solution for your website and then get down to the nitty-gritty of using it, to keep your WordPress website secure.
Protect your WordPress site with MalCare
MalCare uses AI technology in the form of 100+ intelligent signals to scan malware across websites. It has scanned 240,000+ sites already and is continuously learning to keep websites safe from even unknown malware. It offers unlimited scanning and cleaning options along with its site hardening and site management features.
From the makers of BlogVault, the popular WordPress backup service, this is a security plugin that tackles many relevant problems in WordPress Security in one go.
MalCare features
Pros:
- MalCare incorporates all security necessities like scanning, cleaning, site hardening and management in one dashboard.
- MalCare automatically scans sites every day, and is also flexible to accommodate for on-demand scans of your site with only one-click.
- Even malware cleaning can be performed with one-click without any external security personnel meddling with your site.
- MalCare tracks all the changes in your files and can easily rollback the hacked file to a clean version without affecting your site.
- It will never slow down your site since it uses MalCare servers for all security processes.
- It keeps false positives to a minimal by verifying security attacks on the site.
- No technical knowledge is required to set up WordPress recommended site hardening features.
- MalCare helps with site backups using BlogVault’s powerful backup service.
Cons:
- No two factor authentication. As informed by the malcare team, it is on their road map and will be added soon to the product.
- While there is a free version, it gives you only a fraction of MalCare’s features – the firewall and login protection. You can scan your site with this version but you cannot clean it if it gets hacked.
Pricing:
There is a free version and a paid version. The paid version includes the whole range of features and starts from $99 a year.
How to set up the MalCare Security plugin (in 3 simple steps)
Installation and setup
The plugin can be installed automatically easily.
Step 1: Sign up
Open MalCare website and sign up.
Step 2: Check email
MalCare sends an email with a link to the MalCare dashboard. Click on it and it’ll take you directly to the dashboard.
Step 3: Add website
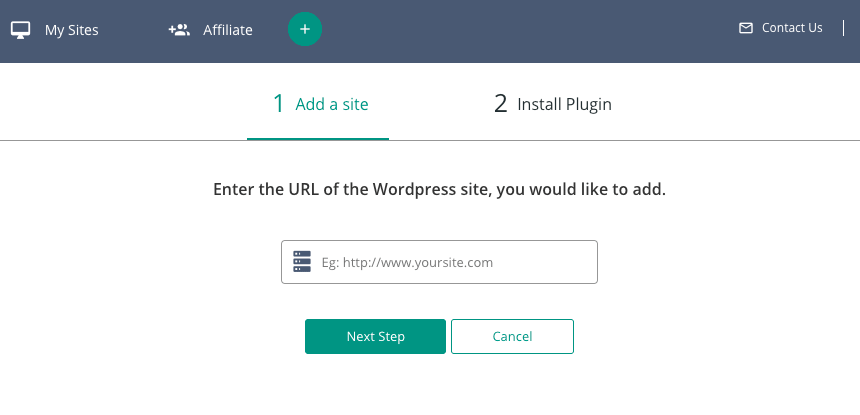
Click on either the Add Site or “+” button and enter the URL of your website.

You can add more sites later on using the same Add Site button.
Step 4: Install the plugin
There are two ways of installing the plugin to your WordPress site.
Method 1:
Enter your website credentials:

You can begin using the plugin now.
Method 2:
You can also install and activate MalCare like any regular plugin on your WordPress admin dashboard or from the WordPress repo. This is the manual process.
Site listing page
Here you can view all your sites under MalCare’s care. You can group them according to tags, themes, plugins and users, while also performing bulk actions like deleting them directly. On this page, apart from checking the last synced timing, you can also view the updates required within the site, alongside the site URL.

The bell icon on the right keeps track of notifications like completed activity on MalCare dashboard.
Dashboard overview
The dashboard is neatly segregated in different sections. First, you can see the site details. Under this, you can see Security, Management, and Backup sections. To the left, there are quick links to perform the same actions quickly.

Features overview
Here’s how you can use the plugin to its maximum potential.
MalCare Scanner
- Select the site you want to scan

- Go to the Security section of MalCare dashboard

- Click on Scan Now next to Scanner card. This is an on-demand scan.

- MalCare also scans sites daily automatically. You can select the timings at which the scans occur under Sync Time option in Settings.
MalCare Cleaner
- Scan site first using MalCare Scanner.
- MalCare sends hack alert to email and as a notification on the dashboard.
- Navigate to Security section in MalCare dashboard.

- Click Auto Clean under Scanner section.

- Enter your website details.

- Select Folder with your WP installation.

- Click Continue.
- Your site is clean now.

MalCare Website Hardening
Steps to set up site hardening
- Click on Site Hardening under Security section in the bottom left corner.

- Select the Security Fixes you want for your site.

- Enter your site details
- Select the WordPress folder where changes are supposed to take place.
- Click Continue.
- Your site is now hardened against security attacks.
MalCare Website Application Firewall
Steps to set up firewall
- Under the Security section, the Firewall feature is to the lower left corner. By default, Firewall is already enabled.

- Here, you’ll see Traffic Requests and Login Requests.
Traffic Requests
Traffic Requests are the number of incoming traffic requests made to your site.
- You can see the request details by clicking on the number that appears beside the term Allowed.
- The Blocked Requests are the number of malicious requests that were automatically blocked by our system. You can see Blocked Requests details by clicking on the number that appears beside the term Blocked.

- Click on Blocked IPs to check the IPs that are not allowed access to your website.
Login Requests
Under the Login Requests section, you can see the number of login attempts on your website login page.
- Besides Successful is the number of times someone has successfully logged into your website.
- Besides Blocked is the number of times a blocked IP has unsuccessfully attempted to log into your website.
- Besides Failed is the number of times someone has unsuccessfully attempted to log into your website.

- You can see all your logs in graph format if you click View Details.

- If you want to disable Firewall, simply click the Disable button.
MalCare website management
- Go to Your Security Report side of the Security section. It shows you the number of Outdated Plugins, Themes, and if the WP Core needs an update as well. MalCare also tells you if your website is Marked Clean by Google Safe Browsing.

- You can update outdated plugins or themes by selecting View Details.
- It’ll take you to the Site Management page from where you can select the plugins, themes, and WP core you want to update.

- The Site Management Plugins page shows you inactive plugins. You can either delete them or make them active.
Reporting
- On the BlogVault Site Listing page, select the website that you want to generate a report of.
- It’ll take you to the site details page. On this page, go to the Reporting section, click on Generate.

- Select a specific timeline within which you want to receive the complete reports, with a general overview, details on updates to be made, backups created and security scans.

- You can choose what things to include in the Report – Overview, Updates, Backups, and Security. You can even create a custom Report Title, Introduction, and Description. In the end, don’t forget to select Continue.
- Click on View Report to see the report.

- Click on Schedule.
- Select the Frequency from the drop-down menu.

- You can choose what things to include in the Report – Overview, Updates, Backups, and Security. You can even create a custom Report Title, Introduction, and Description. In the end, don’t forget to select Continue.
- Click on History.
- Here, you can see a list of all your Reports. You can check the date your Reports were created, what they contain and open them
White-labeling
- Go to Account in the top right-hand corner of the screen. Click on White-Label in the drop-down menu.

- Rename the plugin name, plugin description, Author and URL in the form given.

- Check Hide Plugin from WP Admin Plugin Listing option to hide BlogVault entirely.
- Click Update Branding.
- If you want to show BlogVault on your website again, click Reset to Default. This stores the information about your brand.
- Activate White-Labeling on the particular site by selecting the website and under the White-Label section on the dashboard, click Enable White-Label.
- You will be taken to a task progress monitor.
- Now your website is white-labeled.
Conclusion
WordPress Security is an extremely important part of the WordPress ecosystem. WordPress users need to be careful about their websites. No platform is 100% secure and it only gets worse if you, as a website owner will not take responsibility for your own site. With a few simple measures you can stay one step ahead of any security attacks that might strike your website.
Now that you are ready to control the fate of your website, here’s a summary of how you can use MalCare in the most effective way:
- Install and activate the MalCare security service
- Set up automatic scanning
- Clean malware with one-click
- Check the firewall and login security measures
- Update plugins, themes, and WordPress core
Is your WordPress site secure? What have you done to secure your website? Let us know in the comments section below.
About the author: Akshat Choudhary is the founder and CEO of BlogVault, MalCare and MigrateGuru. He loves building products that solve real problems for real people, and has been building systems and products since 2005. His core beliefs behind building any product are to make sure the end-user doesn’t need assistance… and to assist them in the best possible manner if they need it.


Or start the conversation in our Facebook group for WordPress professionals. Find answers, share tips, and get help from other WordPress experts. Join now (it’s free)!