

In today’s short tutorial, we show you how to add business address in WordPress, and your opening hours as well. All through the Business Profile plugin.
Although many WordPress users exist in an online bubble, a good number of us still maintain an offline, brick-and-mortar presence.
If you’re someone who uses WordPress to promote an offline business, you’ll want to make it as easy as possible for people to find your physical location. You should also display other important information, including your telephone number, email address, and opening hours.
After all, if people want to find out where you are, when you’re open, or how to get in touch, they won’t pull out the phone book or open the local newspaper – they will simply hop online.
If visitors don’t find what they are looking for quickly, they will probably end up at one of your competitors instead. An opportunity lost, for you, and one that can really hurt your bottom line.
Fortunately, adding the all-important business details to a site is remarkably easy with WordPress. Sure, you can do it yourself manually, but why bother when the excellent Business Profile plugin is available? Today, we show you the plugin’s main features, plus we demonstrate how to use it.
Here’s how to add business address in WordPress:
First, the plugin to get:
Installing the Business Profile plugin
The Business Profile plugin is available completely free of charge from the official plugin repository. To install it, log into the WordPress dashboard and then navigate to Plugins / Add New, and search for “Business Profile.”

You’re looking for the plugin by Theme of the Crop. When you’ve found it, click Install Now / Activate Plugin.
With the plugin successfully installed, you should see a new Business Profile menu item added to the WordPress sidebar. Go ahead and click it now.
From this screen, you can configure all of the important details about your business – such as your business name, address, email, and opening hours. Thus, you can easily add business address in WordPress.
Schema markup and rich snippets
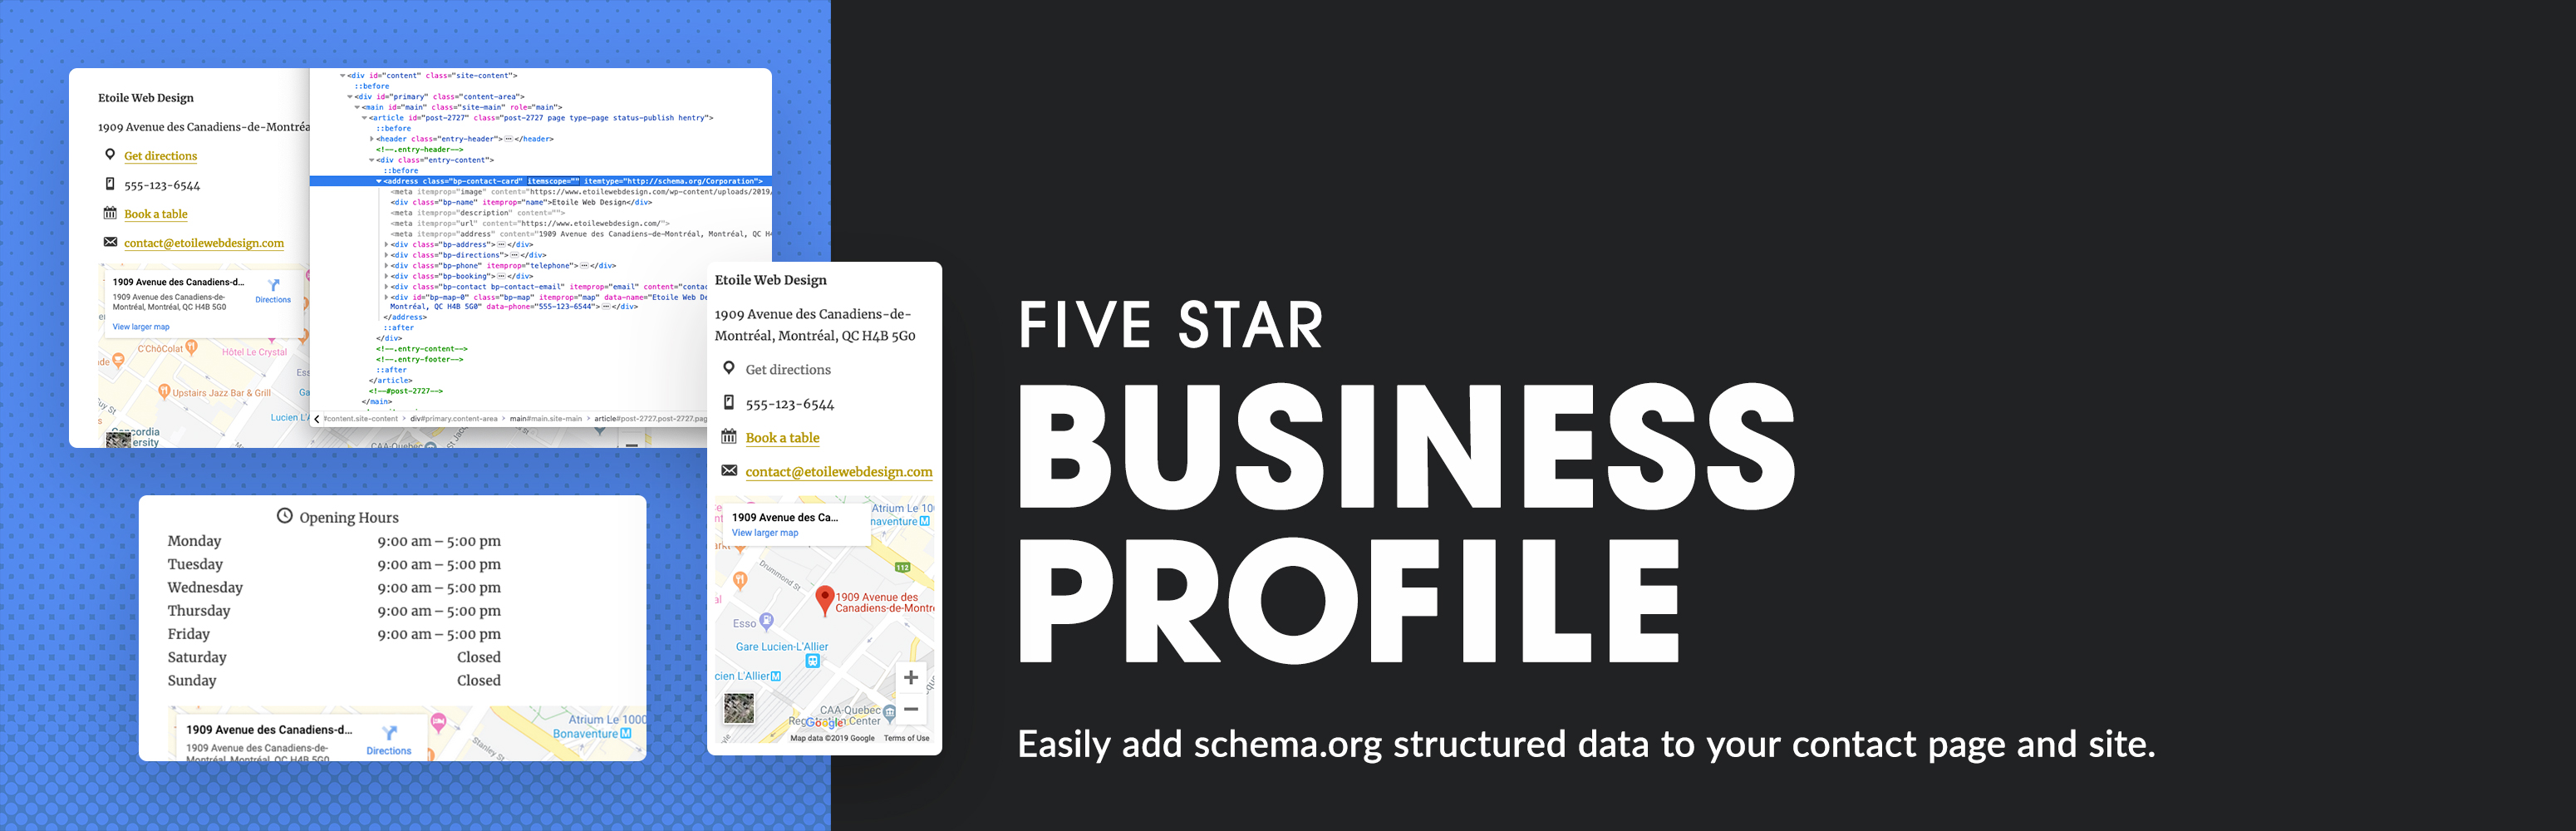
Now, as well as offering a stylish way to display your business’s contact info, users of the Business Profile plugin will also enjoy an SEO advantage – the plugin automatically attaches Schema.org markups to each field.
What does this mean, I hear you ask? Well, it’s the Schema.org markup that powers Google Rich Snippets and also communicates other valuable information to the search engines. Rich snippets help your website stand out in the SERPs, plus they’re proven to boost CTR. As such, they are a nice bonus to enjoy.
There are different types of rich snippets, too – each one is tailored to a specific type of website and displays key info that search engine users might want to know at a glance. For example, people searching for recipes might want to know estimated cooking times. This information would be completely irrelevant to local business searches, though, for which Google would display an address, telephone number, or rating out of five stars.
Configuring the Business Profile plugin
To make sure you add business address in WordPress correctly, the first setting you’ll have to configure is the schema type. This is done by selecting from a drop-down list. Options include organization, corporation, sports team, and 24 local business types – from animal shelters right the way through to travel agencies.

As you work your way down the screen, the next step is the Contact Information section. Start by typing your company’s name and address. If you want to display a map, click the Retrieve map coordinates button beneath – for this to work, your address needs to be inputted in the correct format. To test your coordinates are pointed at the right place, click the view button to be whisked away to Google Maps.
If the map coordinates sync correctly, continue working your way to the bottom of this section, inputting your telephone number and email address. You can also choose to link to a contact page by selecting any of your published pages from a drop-down list.

The final section to configure in order to add business address in WordPress is the Schedule section. This is where you get to choose your business hours.
Start by clicking the Add another opening time button. You can configure each day of the week manually, or you can create a single entry for days that share the same opening times.
For example, if your business is open 9-5 from Monday to Friday, this can be configured in just one entry. If, however, you close early on Friday, select only Monday to Thursday. After this, you will need to create a separate entry for Friday’s opening times.
When you’ve selected your day(s), the final step is to specify the opening hours. Click on the set a time slot option, then choose the times from another drop-down list. You can add as many entries as you require by clicking the Add another opening time button if needed.

And that’s all you need to do to configure the plugin – everything is handled on this one screen. When you’re done, remember to hit Save Changes.
Displaying your address, contact details, and opening hours
Finding out how to add business address in WordPress is one thing, but then you also need to display this info somewhere on your website. The Business Profile plugin gives you two options.
First, a shortcode: [contact-card]. Simply paste this shortcode onto any post, page, or custom post type and you’ll have yourself a fully functional About page, complete with interactive map. The page will look something like this:

However, not every visitor will dig around your site looking for an About page. Some people will expect to see this important information at a glance, on every page of your site. This makes your contact info well-suited to a sidebar area, and the Business Profile plugin comes with a dedicated widget.
To add your address and opening hours to a widget, navigate to Appearance / Widgets. Find the Contact Card widget, then drag and drop it into your preferred widget space.

Now it’s time to configure the widget, which is your final step to add business address in WordPress. Because widget areas offer limited space compared to a blank web page, displaying too much information can overload the sidebar. To solve this problem, the plugin lets you pick and choose which information is displayed in your widget.
The widget setup includes a list of checkboxes that let you select the details you want – for example, your name, address, phone number, opening hours, and whether you want to display a map.

Hit Save before you finish, then you’ll be left with a contact widget that looks like this:

Final thoughts
And that concludes today’s tutorial on how to add business address in WordPress. If you want to add your business’s contact details to your website – including opening hours – then look no further than the Business Profile plugin. Not only is it super-easy to use, but it also adds the schema markup to your pages. This can improve discoverability in the SERPs and even attract more visitors to your website!
Are you using the Business Profile plugin? Share your thoughts and ask any questions in the comments below!


