
Whether you want to display events run by your company or those happening within the industry or a local community, an events calendar is the perfect solution. It enables you to show important information for multiple events in a familiar calendar-style format.
In this article, we’ll introduce you to one of our favorite free plugins for adding an events calendar to WordPress. Then, we’ll guide you through all the steps you need to take to publish your first event.
How to add an events calendar to WordPress
Introducing the Events Calendar plugin
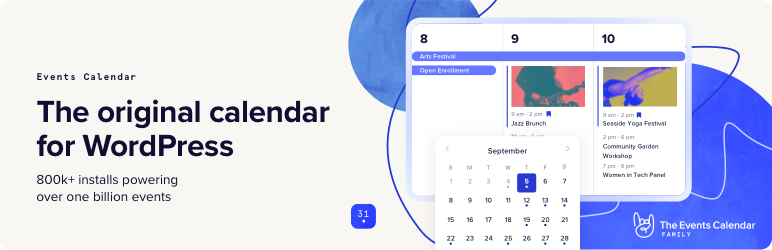
Events Calendar offers a simple and robust option to add an events calendar to WordPress. It enables you to choose between different types of calendars, set up specific venues, and even specify prices.
Key features ⚙️
- Provides a robust calendar and event management system
- Includes events and venues as custom post types
- Comes with different styles of calendars
- Integrates with Google Maps to display event addresses
How to set up the Events Calendar plugin (in 5 simple steps)
First and foremost, we recommend that you take a minute to back up your site before throwing a new plugin into the mix. If you’ve never used a backup tool before, UpdraftPlus is our favorite free option. On the other hand, if a premium service is what you’re looking for, VaultPress should be right up your alley.
If you’re familiar with WordPress plugins, you probably know how to install them. In case you’re not, or you just need a refresher, we’ll cover that in our first step below.
Step #1: Install the Events Calendar plugin
From your WordPress dashboard, find the Plugins tab, hover over it, and then when the popup window appears, click on Add New Plugin. If you’re using a slightly older version of WordPress, it might say simply Add New – but it’ll take you to the same next step.

On the subsequent screen, use the search bar over on the righthand side to type in “events calendar“. The very first result should be the Events Calendar plugin we’ll be using for this tutorial. Just to be sure, double check that the developer is the same. It should say “by The Events Calendar” on it. Once you confirm that it’s the right one, click on Install Now.

Then wait a few seconds while it does its WordPress magic, and when it’s ready, the Install Now button will transform into an Activate button. Click that and you’ll be brought to the settings / setup screen, but first you’ll be greeted by a popup window:

You can click either Skip or Allow & Continue. It won’t affect the functionality of the plugin in any sort of way so the choice is entirely personal. After you get past this screen, you are ready for the more fun part of this guide – configuring your settings, customizing your calendar, adding venues, and creating your first event.
Step #2: Configure your settings
As soon as you get past the popup window, a new Events tab will appear in the WordPress dashboard. Click on it and select the Settings option. We’re going to tinker with the plugin’s configuration before we start adding events to our calendar.
To avoid overwhelming you, we’re going to focus on a few specific settings. These settings govern the behavior and look of the events calendar you’ll display on your site.
Let’s start by going to the Settings > Display tab. Here, we’re going to configure the maximum number of events that will appear per page and decide whether to enable comments for them. This can be a good idea if you plan on answering questions on your site:

Next, the plugin enables you to specify the URL for your main events page. If you’re looking to change the default, you should probably stick to something simple for clarity’s sake:

Now move on to the Currency section in the Display tab. Set the default currency you wish to use for your events, which will depend on your location:

Finally, the plugin enables you to implement Google Maps for each event, to display specific addresses. You can even set the default zoom level for each.
We’ll show you how to include event locations in a minute, but for now, we recommend that you check that box. A good map is always welcome!

That takes care of Events Calendar’s key settings, so let’s move on to customizing our calendar.
Step #3: Select your calendar style
Events Calendar comes with two default calendar styles. To switch between them, return to the plugin’s Settings > Display tab. The Calendar Display section will appear right at the top of the screen:

Both styles are rather minimalist by default – which is excellent since they look good paired with a lot of modern themes. The Default Styles option is shown here and it offers a very understated look:

By default, your events page will display any events scheduled for that day in list format. However, the Display section enables you to change that using HTML. To do so, scroll down and locate the Advanced Template Settings subheading, then add any new elements you want using the WordPress editor within:

Now that you’ve decided on your calendar style, let’s talk about venues.
Step #4: Add new venues
Adding a new venue couldn’t be simpler. Go to Events > Venues in your dashboard, then click on Add New. While using this plugin, WordPress treats venues as custom post types, so you’ll get to add all the necessary information using the default editor. First, choose a name for your venue and type a description:

Then scroll down and fill out the fields in the Venue Information section. If you want to display a map, make sure to check the corresponding options:

Now hit Publish and we’re good to go. Let’s go ahead and create our first event.
Step #5: Create your first event
The process of adding a new event is quite similar to adding a venue. Head to Events > Add New and select a name and description. Next, scroll down and select a date and a venue. Having gone through step number three, you can choose the venue using a drop-down menu:

If the event in question is paid, remember to set a price in the Event Cost section:

Finally, add a featured image for your event, which will display when users click on it within your calendar to find out more information. All that’s left is to hit Publish and we’re done.
That’s how you add an events calendar to WordPress!
Adding an events calendar to WordPress: Conclusion
Adding an events calendar to your website is a great way to communicate information regarding multiple events in a user-friendly format. It will tell your website’s visitors exactly what’s happening when, and can provide them with information such as event price, description, and address.
Fortunately, there are some excellent free and premium plugins that can help you add one to your site, including Events Calendar. In this post, we’ve shown you how to add an events calendar to WordPress website using the former. Let’s quickly recap the steps involved:
- Install the Events Calendar plugin.
- Configure the plugin’s settings.
- Select the type of calendar you want to use.
- Add venues for your events.
- Create your first event!

FREE GUIDE
4 Essential Steps to Speed Up Your WordPress Website
Follow the simple steps in our 4-part mini series and reduce your loading times by 50-80%. 🚀


Hi, I am facing issue when I paste the Event URL on Page in backend it shows proper event but in frontend only URL is showing. Please help to solve this issue. Please find attached images to understand the issue more clearly.
The page title isn’t displayed on /events/ when the plugin is installed in Hestia. Any code to fix this?
Hey Kris, it seems that this happens with all themes. We’ll be looking for a solution to this for Hestia. Thanks for notifying us!
Hi John! I have multilingual website using different menus for each language. And I want to add event calendar only to Portuguese version (with Portuguese menu bar) of my website. However, events calendar is published with English menu bar.
Do you have any suggestions?
Thanks in advance!
Hello 2madeira. Thanks for your question. We recommend posting it on the support forum for The Events Calendar plugin. Their team may be able to provide a direct workaround for your problem.
https://wordpress.org/support/plugin/the-events-calendar
Best of luck 🙂