
There are a few different scenarios in which you might need to migrate WordPress. You could be moving hosts, creating a test site, making a test site live…you name it.
In this post, we’re going to cover everything you need to know about WordPress migration by doing two things:
- Discussing some of the most common scenarios in which it’s a good idea to migrate WordPress.
- Sharing detailed step-by-step tutorials for how best to migrate your WordPress site in each scenario.
Migrating a site is a pretty straight-forward process and you don’t need to pay a professional to do it for you.
Just follow our step-by-step guides. Here are the scenarios we’ll cover…
a) Move your WordPress site to a new host but keep the same domain name
Want to move your site to a new host and keep your existing domain name?
Here’s what you do:
Step 1: Choose a new web host
To make things easier, we recommend choosing a host that offers free migration assistance for new customers.
Some hosts that do this include SiteGround and A2 Hosting.
We have a full review article comparing the best WordPress hosts if you want to do more research on this.
Step 2: Back up your WordPress files
Listen, I know it’s tempting to skip this step, but don’t do it. You NEED to have a backup on hand in case something goes wrong.
If you’re not sure how, read our step-by-step guide for how to backup WordPress. While you’re at it, here are 10 mistakes to avoid when backing up your site.
Step 3: Set up new hosting account and migrate site
Now that you’ve got a backup of your site, it’s time to set up your new hosting account.
What you’ll have to do here depends on the host you choose to use, so just follow the prompts provided by your host.
If your host provides free migration, you should request for your migration service now. You’ll probably have to fill in a form and you should receive a confirmation email that tells you someone is working on migrating your site.
If your host doesn’t provide free migration, don’t worry – there are several tools and plugins that you can use to simplify the process. We recommend Duplicator because it’s free and reliable:

Here’s a quick summary of how to use this plugin to migrate WordPress (or, you can read the full detailed guide here).
- Install and activate the Duplicator plugin on your WordPress site
- Create a packaged version of your site’s files and database
- Create a new MySQL database and user on your new host
- Upload the installer and archive files from Duplicator to your new host
- Run the Duplicator installer

Step 4: Switch your DNS record settings
Almost done! Now, you just need to change your domain from pointing to your old host to pointing at your new host.
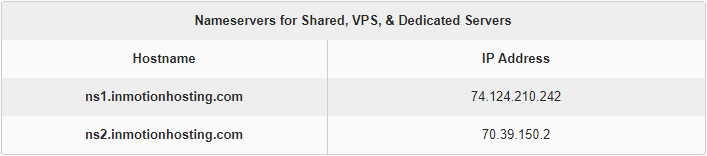
Your new host will provide two nameservers for you to point the domain to. Here’s an example of what they look like:
Once you have those nameservers (consult your new host’s support if you can’t find them):
- Log in to your domain registrar
- Navigate to the DNS section
- Change the two nameservers from the values for your old host to the nameservers provided by your new host
If you’re unsure how to change your nameservers, here are the help articles for common domain registrars:
Keep in mind that when you update your nameservers, the changes aren’t immediate (in fact, you may need to wait for as long as 48 hours for the changes to take effect).
b) Move your WordPress site to an entirely different setup (new host and domain)
If you want to migrate WordPress to an entirely different setup, this is actually pretty similar to moving your site to a new host.
You’ll just have to add on a few more steps:
Step 1: Choose a new web host + registrar
Plenty of hosts offer free domain names when you sign up as a new customer, so check out the various promotions and see which suits you the best!
Step 2: Back up your WordPress files
Exactly like how we specified previously.
Step 3: Set up a new hosting account, then migrate your site AND domain
Here, the Duplicator plugin will come in handy again. Only this time, you’ll take advantage of a Duplicator function that lets you automatically update your site’s URLs to use your new domain.
To learn more about using the Duplicator plugin to migrate your domain, read our guide.
Step 4: Set up 301 redirects from your old domain and notify Google that you’ve changed your domain name
If you don’t want your migration to be accompanied by a huge drop in traffic, then you’ll need to set up the proper 301 redirects.
Again, our guide on domain migration walks you through the process. Click here to go straight to the relevant section.
c) Migrate your WordPress site to create a staging environment
If you’re not 100% sure what a staging site is, it’s basically a clone of your existing website that you use to test out changes and updates to your site. Because it’s just for testing, you’ll make it private so that customers won’t accidentally stumble upon it.
Now, why is it so important to have a staging site?
Well, having a staging site will ensure that you don’t break your live site with new changes and updates.
Now, this is crucial for ALL business owners, not just folks who experiment with themes and change the look and feel of their websites regularly.
Even if you don’t touch your website’s front-end, you’ll probably still:
- Run WordPress updates, including theme and plugin updates
- Install new plugins
- Change theme settings
Whenever you do any of the above, you should do it on your test site first. This way, if something goes wrong, your live site won’t be affected.
Some hosts offer built-in staging site functionality. Otherwise, you can basically:
- Migrate your WordPress site to a subdomain
- Add noindex rules and use .htaccess to make it private
- Migrate your test site back to your live site whenever you want to make the changes live

To learn more, check out our guides on setting up a WordPress staging site and how to clone a WordPress website.
A final word on how to migrate WordPress
Learning how to migrate WordPress can seem like a daunting task… but it’s actually pretty straightforward.
Just set aside, say, an hour or two of your time, and follow the process we’ve outlined for your specific scenario.
While migrating WordPress is pretty straightforward, remember to always make a backup of your site before you try any of these methods.
Do you have any other questions about how to migrate WordPress? Leave a comment and we’ll try to help out!


Or start the conversation in our Facebook group for WordPress professionals. Find answers, share tips, and get help from other WordPress experts. Join now (it’s free)!